Kafka, for your data pipeline? Why not?
in Blog
Kafka was developed and open-sourced by LinkedIn in 2011, and it has since quickly evolved from messaging queue to a full-fledged streaming platform with an exuberant ecosystem. Many tech companies, besides LinkedIn such as Airbnb, Spotify, or Twitter, use Kafka for their mission-critical applications.
Kafka can be used for many things, from messaging, web activities tracking, to log aggregation or stream processing. From my point of view as a data professional, Kafka can be used as a central component of a data streaming pipeline to power real-time use cases such as fraud detection, predictive maintenance, or real-time analytics.
There are entire books written about Kafka, and it can be daunting to get started. However, in this project, I will show you how easy it is to create a streaming data pipeline using Docker, Kafka, and Kafka Connect.
Business problems
Let’s define some business problems to work towards.
Say you are a data engineer working for an e-commerce website that has users signing up continuously. The marketing team wants to send a personalized email to every customer who signs up as soon as they do so. Here are some problems with the newly proposed feature:
The signup service is coupled with emailing service. In other words, every time the requirements of the marketing change, you have to make a change to the signup service, which could bring down the whole thing if you’re not careful.
Marketing requires that the email should be sent instantaneously when a user signs up. In engineering terms, they meant within 5s from when a customer signs up.
The personalization model is hosting on a different network than your signup service.
Another business problem related to customer data is that your CEO wants every employee to know the current number of customers and where they’re signing up from. She has the admin team install several big monitors in the middle of the office, and your team has to create a dashboard that will be displayed on these monitors.
Your current data warehouse only fetches user data every day, so you cannot use the existing batch pipeline.
The dashboarding service is also on a different network, so you cannot query the production database directly.
After researching several options, you realized that using Kafka and Kafka Connect running on Docker seems to be the best option for your problems. Here are what you found after the research.
What is Kafka?
](https://cdn-images-1.medium.com/max/2000/0*vUjKXckBRPXoj1TO.png)
Kafka is an open-source stream-processing platform written in Scala and Java. According to the Kafka website, a streaming platform has three key capabilities:
Publish and subscribe to streams of records, similar to a message queue or enterprise messaging system.
Store streams of records in a fault-tolerant durable way.
Process streams of records as they occur.
Kafka is generally used to build either real-time applications that react to a stream of data or real-time data pipelines that reliably get data between systems or applications. In our use case, we need to stream data from our production system (Postgres DB) to a separate email service (MySQL DB) that the SE team is working on, as well as to S3, the data team’s data lake.
Here are some concepts that you should familiarize yourself with regarding Kafka:
Broker: Kafa broker receives messages from producers and stores them by unique offset. The broker will also allow consumers to fetch messages by a topic, partition, and offset.
Message: is a unit of data in Kafka. You can think of each message as a record in your database.
Topics and partitions: Each topic is a named stream of messages. A topic is made up of one or more partitions. Partitions allow Kafka to scale horizontally by distributing data across brokers.
Kafka Connect?
](https://cdn-images-1.medium.com/max/2048/0*dORd7k_z4d7R2J9t.jpg)
Kafka Connect, an open-source component of Kafka, is a framework to connect Kafa with external systems such as databases, key-value stores, search indexes, and file systems. Here are some concepts relating to Kafka Connect:
Connectors: A connector is a logical job that is responsible for managing the copying of data between Kafka and other systems
Source Connector: A connector that copies data from a system to Kafka
Sink Connector: A connector that copies data from one or more Kafka topics to a system
Tasks: Each connector instance coordinates a set of tasks that copy the data from a system to Kafka or vice versa
Docker and docker-compose?
Docker is a container technology that allows us to package up an application with all the parts it needs, such as libraries and dependencies. Instead of having to install Kafka, Kafka Connect, and all the databases on your local machine, you can use Docker to quickly and effectively deploy these services on your local computer.
Docker-compose is a high-level command that allows you to use a YAML configuration file to deploy Docker containers with a single command.
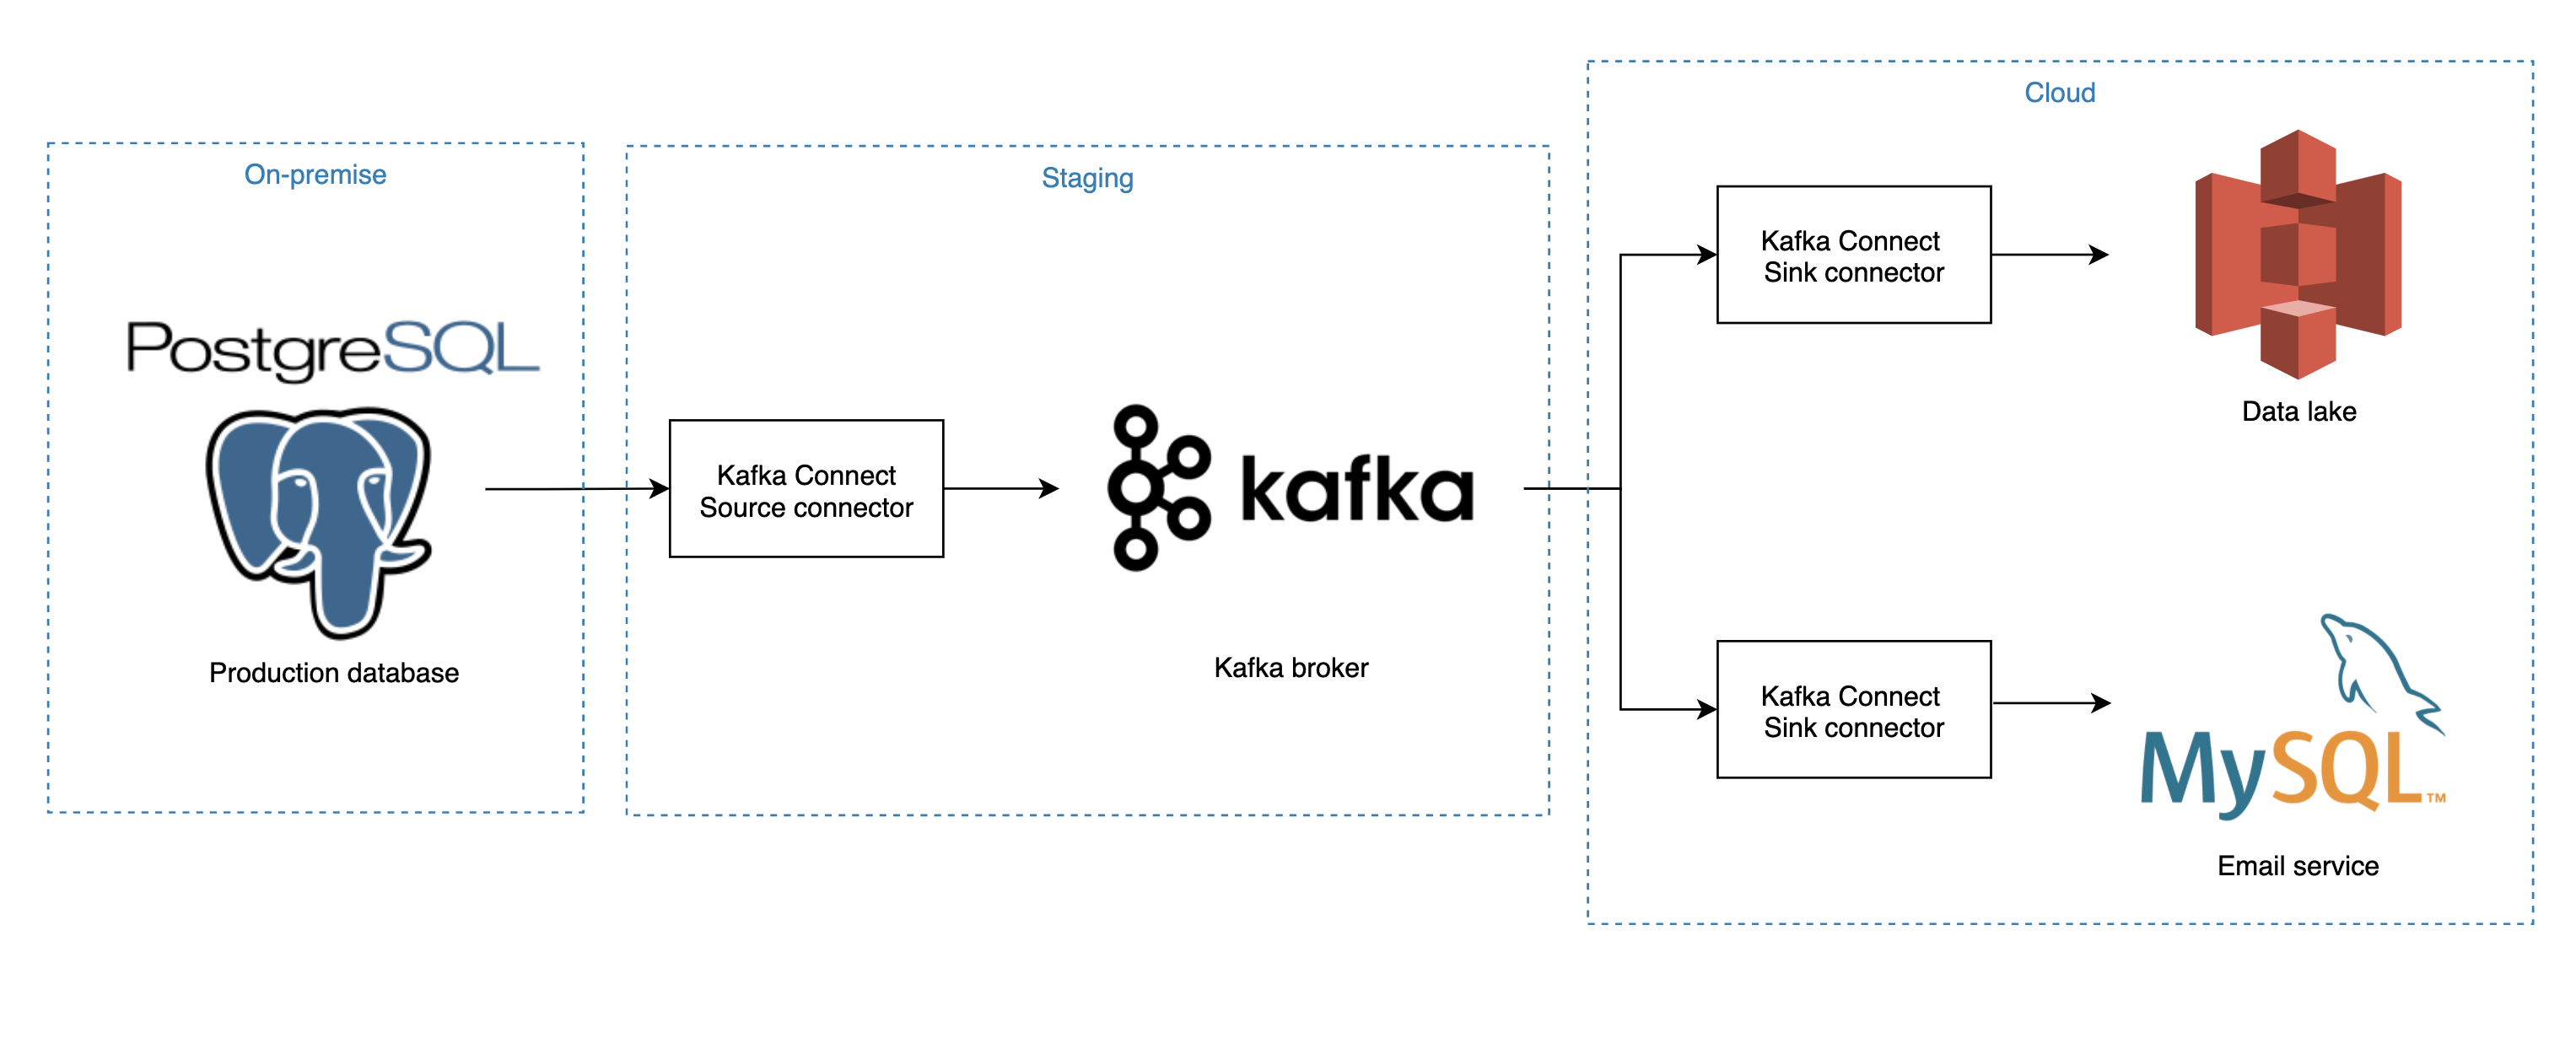
The architecture
With all the terminologies out of the way, let’s look at our architecture for this solution.
Our solution’s architecture
For our example, we will use Kafka connect to capture changes in the Users table from our production database on-premise and write to a Kafka topic. Two connectors will subscribe to the topic above, and write any changes to our email service’s MySQL database as well as the S3, our data lake.
The fun part
Now, this is the fun part! Let’s dive right in.
Clone my repo
To get started, clone my repo by typing the following to your terminal:
    git clone https://github.com/tuanchris/kafka-pipeline
    cd kafka-pipeline
Install Docker and docker-compose
We will use Docker and docker-compose for this project, and you can quickly lookup how to install them for your OS.
Create an environment
Assuming you already have conda installed, you can create a new env and install the required packages by running:
conda create -n kafka-pipeline python=3.7 -y
conda activate kafka-pipeline
pip install -r requirements.txt
We will need PostgreSQL to connect to our source database (Postgres) and generate the streaming data. On Mac OS, you can install PostgreSQL using Homebrew by running:
brew install postgresql
pip install psycopg2
You can google how to install PostgreSQL for other platforms
Start the production database (Postgres)
We use docker-compose to start services with minimum effort. You can start the Postgres production database using:
docker-compose -f docker-compose-pg.yml up -d
Your Postgres database should be running on port 5432, and you can check the status of the container by typing docker ps to a terminal.
Generate streaming data
I have written a short script to generate user data using the Faker library. The script will generate one record per second to our Postgres database, simulating a production database. You can run the script in a separate terminal tab using:
python generate_data.py
If everything is set up correctly, you will see outputs like so:
Inserting data {'job': 'Physiotherapist', 'company': 'Miller LLC', 'ssn': '097-38-8791', 'residence': '421 Dustin Ramp Apt. 793\nPort Luis, AR 69680', 'username': 'terri24', 'name': 'Sarah Moran', 'sex': 'F', 'address': '906 Andrea Springs\nWest Tylerberg, ID 29968', 'mail': 'nsmith@hotmail.com', 'birthdate': datetime.date(1917, 6, 3), 'timestamp': datetime.datetime(2020, 6, 29, 11, 20, 20, 355755)}
And with that, we have simulated a production database with new customer data every second. Pretty neat, huh?

You can connect to the Postgres database using a SQL client such as DataGrip or DBeaver to double the check that the data is writing to the Users table. The connection string should be jdbc:postgresql://TEST:password@postgres:5432/TEST
Start our Kafka broker
Great, now that we have a production database running with data streaming to it, let’s start the main components of our simulation. We will be running the following services:
Kafka broker: Kafa broker receives messages from producers and stores them by unique offset. The broker will also allow consumers to fetch messages by a topic, partition, and offset.
Zookeeper: Zookeeper keeps track of the status of Kafka cluster nodes as well as Kafka topics and partitions
Schema registry: Schema registry is a layer that will fetch and server your metadata (data about data) such as data type, precision, scale… and provides compatibility settings between different services.
Kafka Connect: Kafka Connect is a framework for connecting Kafka with external systems such as databases, key-value stores, search indexes, and file systems.
Kafdrop: Kafdrop is an opensource web UI fro viewing Kafka topics and browsing consumer groups. This will make inspecting and debugging our messages much easier.
We can start all of these services by running:
docker-compose -f docker-compose-kafka.yml up -d
Wait a few minutes for docker to download the images and for the services to start up, and you can proceed to the next step. You can view logs outputs after the previous command complete using:
docker-compose -f docker-compose-kafka.yml logs -f
Configure source connector
Next, we will configure our source connector to our production database (Postgres) using the Kafka connect rest API. Paste the following to your terminal:
curl -i -X PUT http://localhost:8083/connectors/SOURCE_POSTGRES/config \
     -H "Content-Type: application/json" \
     -d '{
            "connector.class":"io.confluent.connect.jdbc.JdbcSourceConnector",
            "connection.url":"jdbc:postgresql://postgres:5432/TEST",
            "connection.user":"TEST",
            "connection.password":"password",
            "poll.interval.ms":"1000",
            "mode":"incrementing",
            "incrementing.column.name":"index",
            "topic.prefix":"P_",
            "table.whitelist":"USERS",
            "validate.non.null":"false"
        }'
When you see HTTP/1.1 201 Created, the connector is successfully created. What this command does is sending a JSON message with our configurations to the Kafka Connect instance. I will explain some of the configurations here, but you can reference the full list of configs here.
connector.class: we are using the JDBC source connector to connect to our production database and extract data.
connection.url: connection string to our source database. Since we are using Docker’s internal network, the database address is Postgres. If you are connecting to external databases, replace Postgres with the database’s IP.
connection.user & connection.password: credentials for our database.
poll.interval.ms: frequency to poll for new data. We are polling every second.
mode: the mode for updating each table when it is polled. We are using an incremental key (index), but we can also update using a timestamp or bulk update.
topic.prefix: the prefix of the topic to write data to Kafka.
table.whitelist: List of table names to look for in our database. You can also set a query parameter to use a custom query.
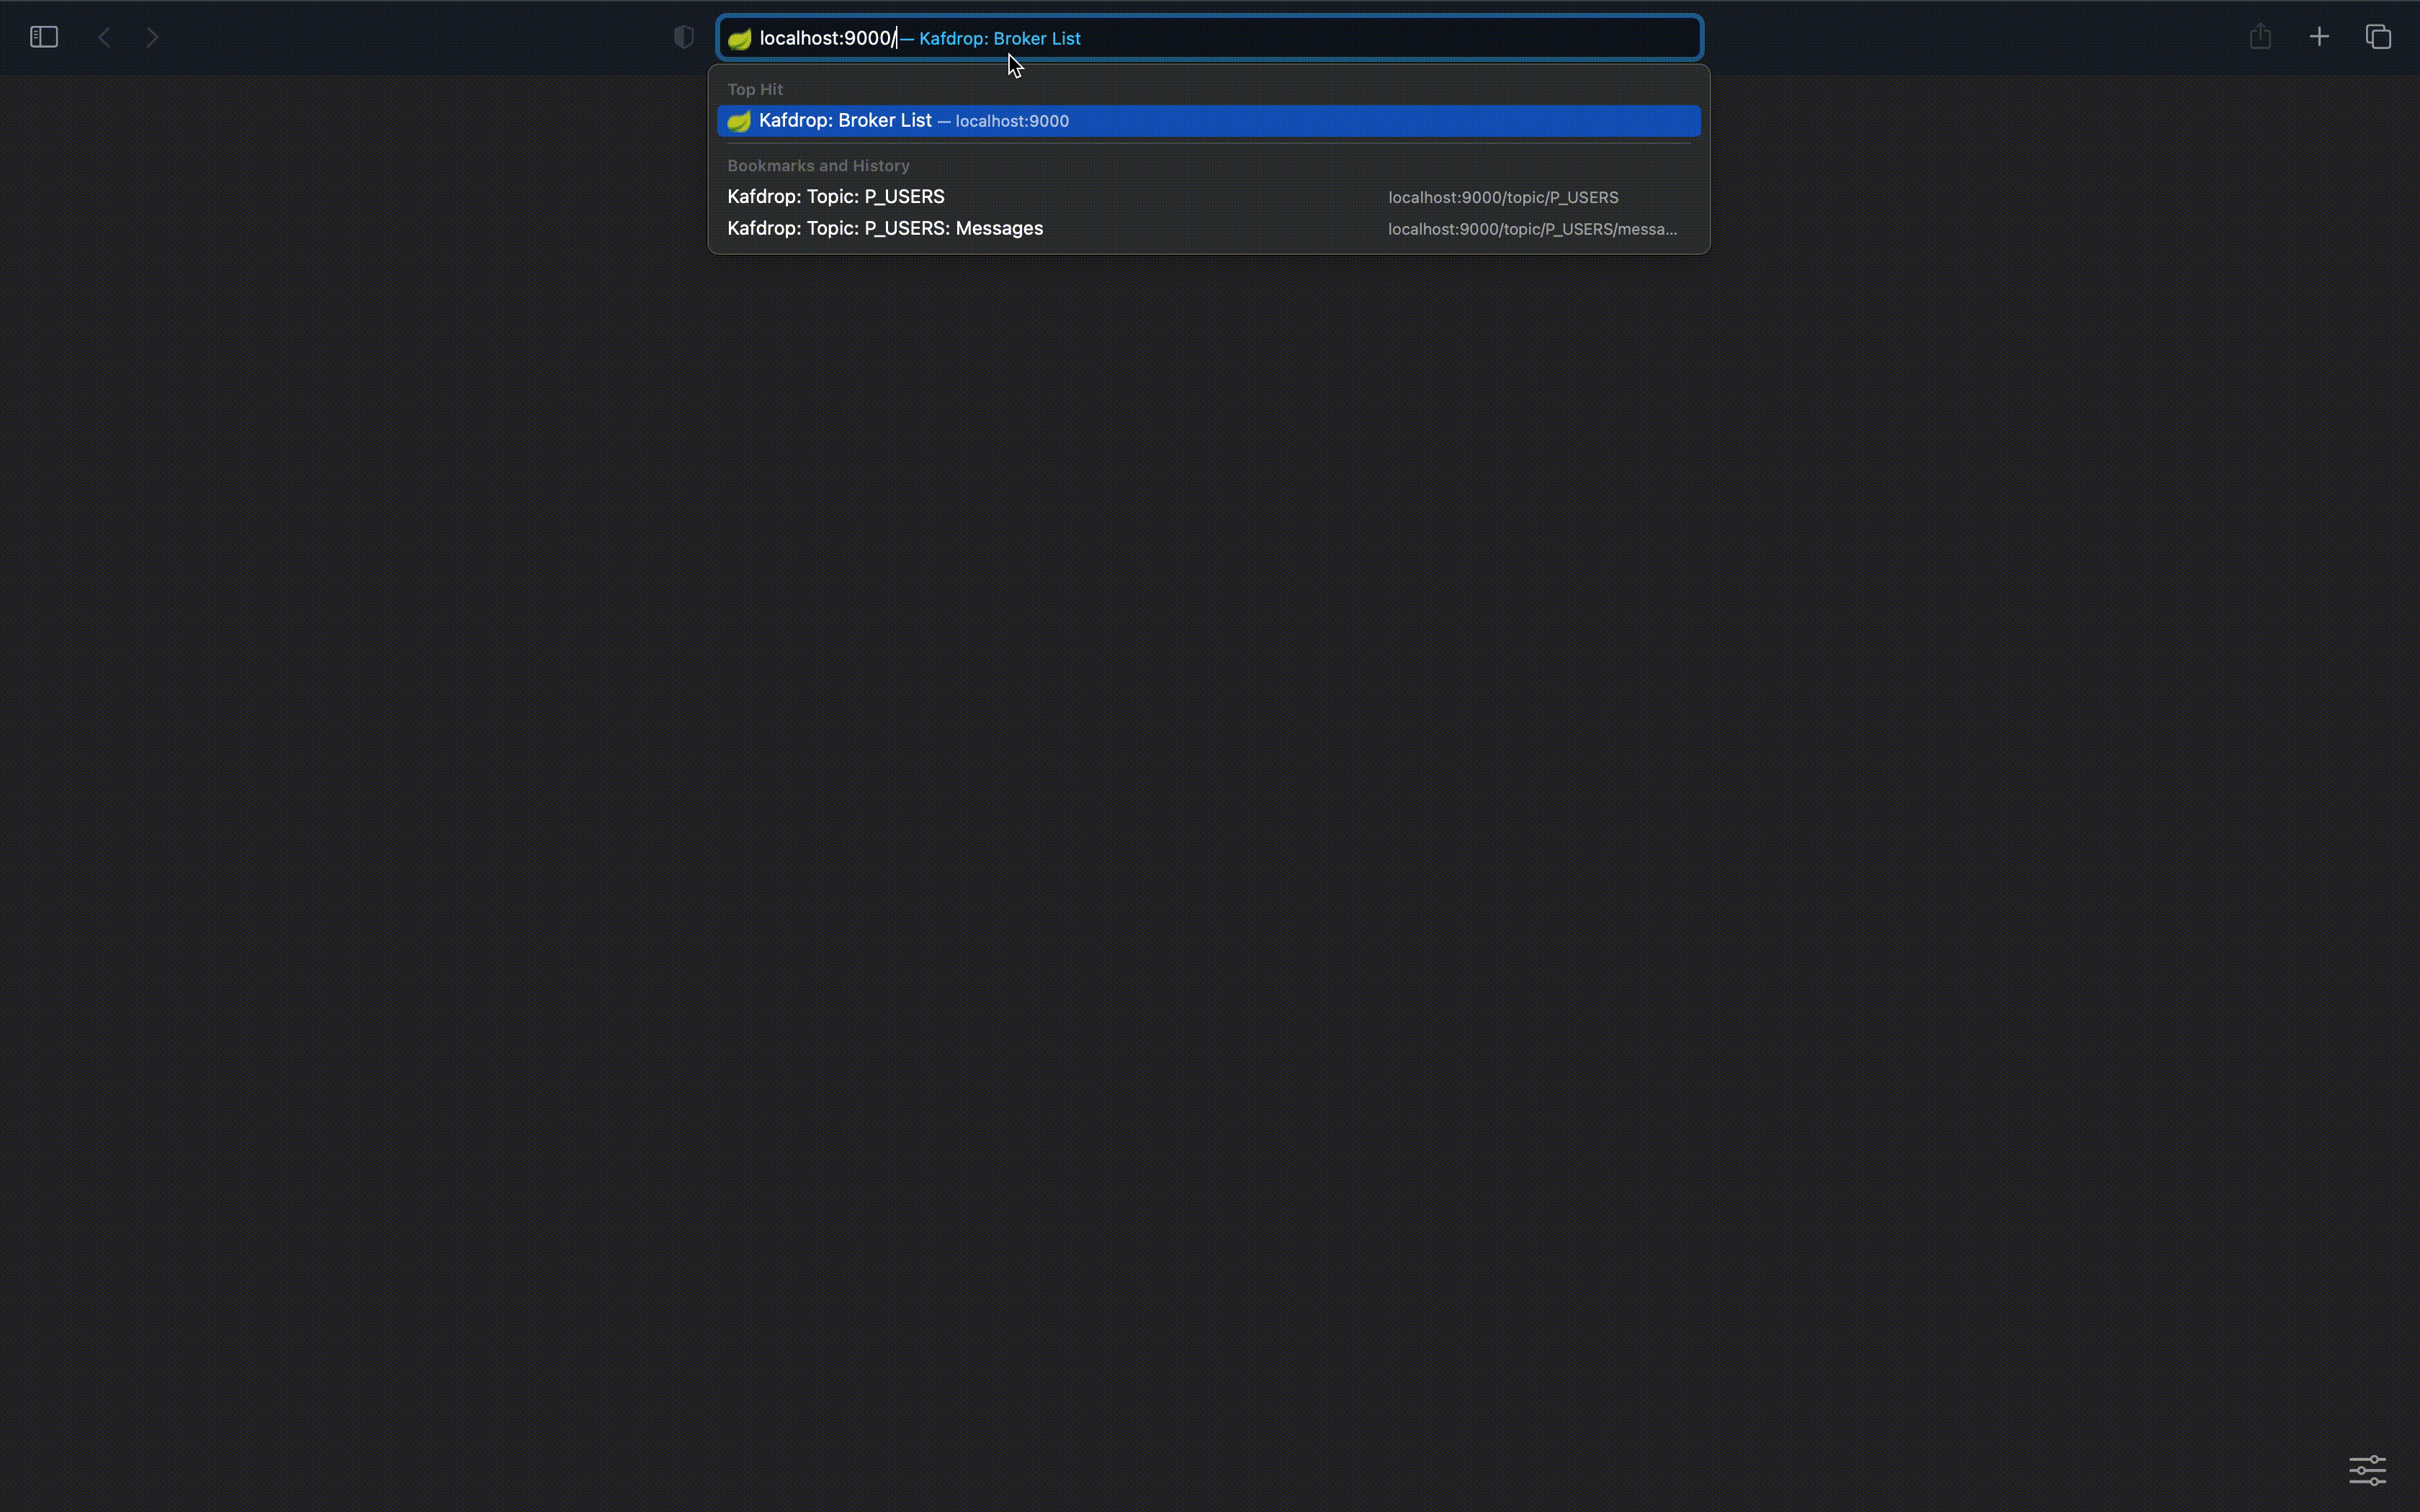
With the Kafdrop instance running, you can open a browser and go to localhost:9000 to see our P_USERS topic. You can go into the topic and see some sample messages on our topic.
Just like that, you have a stream of User data to Kafka.
Create MySQL sink connector
Let’s start first with Mysql. Start the Mysql database by running:
docker-compose -f docker-compose-mysql.yml up -d
Here is our configuration:
curl -i -X PUT http://localhost:8083/connectors/SINK_MYSQL/config \
     -H "Content-Type: application/json" \
     -d '{
       		"connector.class":"io.confluent.connect.jdbc.JdbcSinkConnector",
       		"tasks.max":1,
       		"topics":"P_USERS",
           "insert.mode":"insert",
       		"connection.url":"jdbc:mysql://mysql:3306/TEST",
       		"connection.user":"TEST",
       		"connection.password":"password",
       		"auto.create":true
     	}'
That’s it. Your generated data should now be streaming from Postgres to Mysql. Let’s go over the properties of the Mysql sink connector:
insert.mode: How to insert data to the database. You can choose between insert and upsert.
topics: The topic to read data from
connection.url: Sink connection URL
connection.user & connection.password: Sink credentials
auto.create: Auto-create table if not exits
Let’s query the MySQL database to see if our data is there. We can see that both the record count and max timestamp is updating!
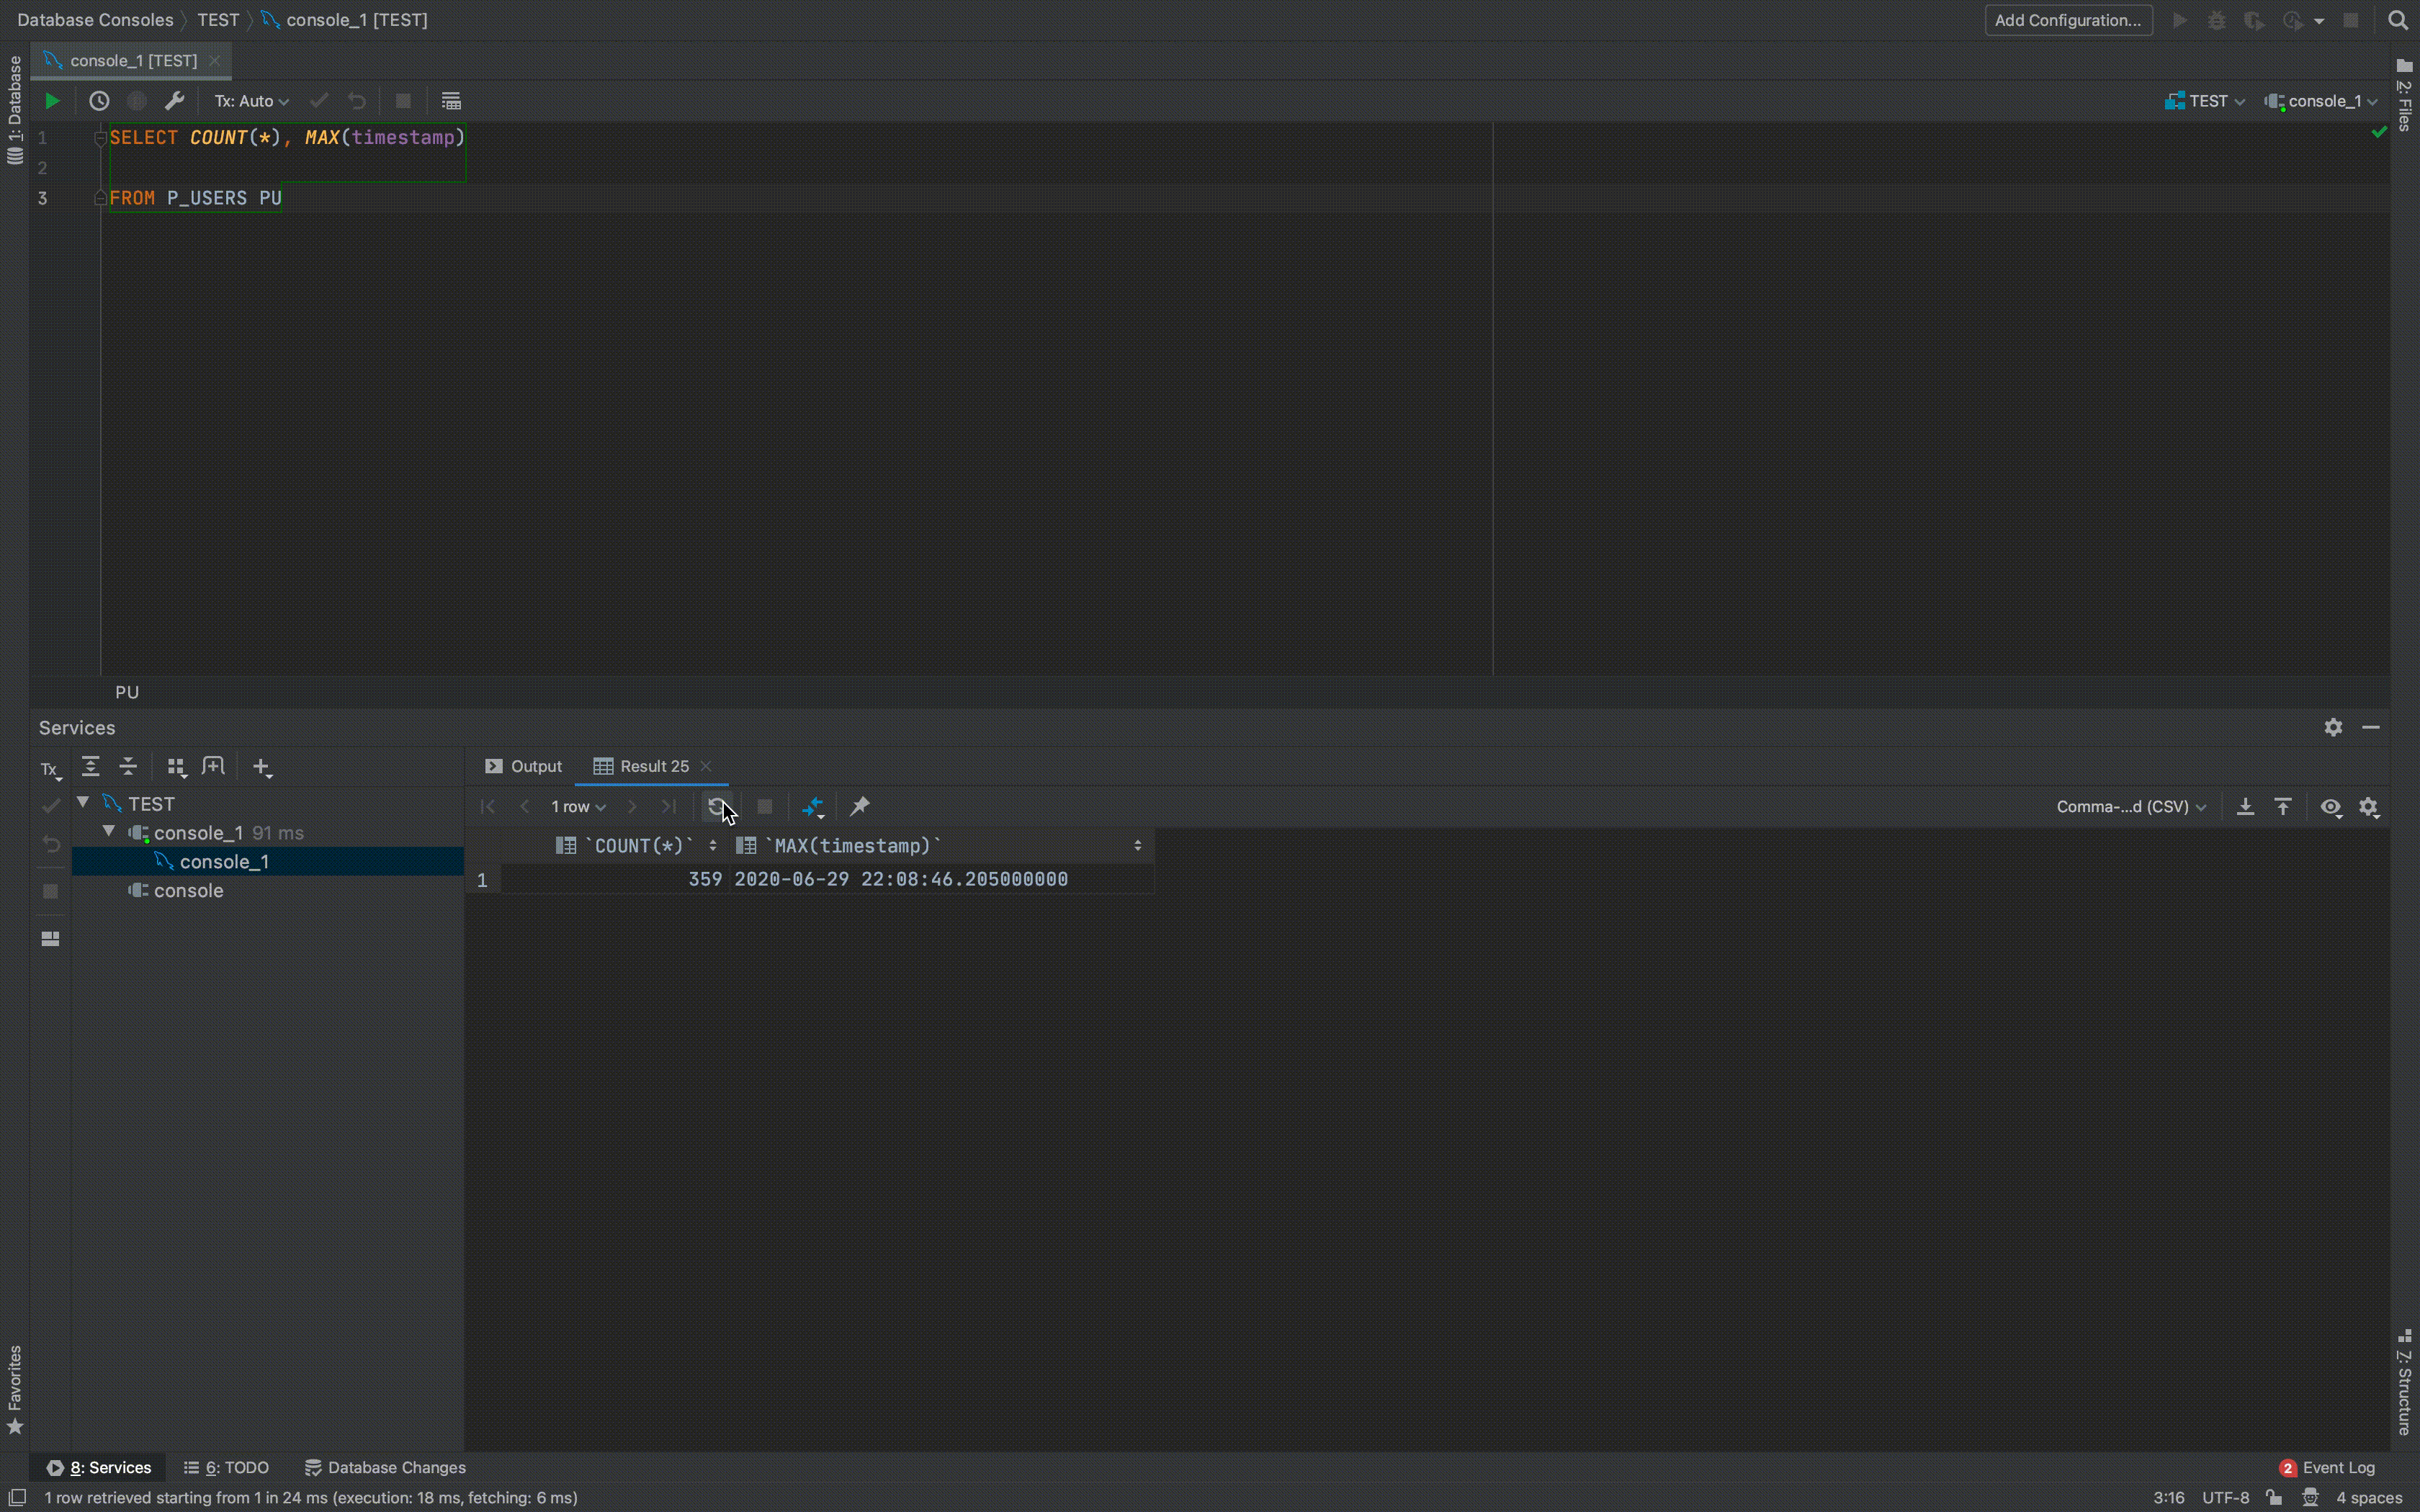 Querying the SQL database, we can see new data coming in real-time
Create an S3 sink connector
To write data to S3, it is equally easy and straight forward. You will need to setup environment variables: AWS_ACCESS_KEY_ID and AWS_SECRET_ACCESS_KEY in the docker-compose-kafka.yml file. After that you can create an S3 connector using the following configs:
curl -i -X PUT -H "Accept:application/json" \
    -H  "Content-Type:application/json" http://localhost:8083/connectors/SINK_S3/config \
    -d '
{
    "connector.class": "io.confluent.connect.s3.S3SinkConnector",
    "s3.region": "ap-southeast-1",
    "s3.bucket.name": "bucket-name",
    "topics": "P_USERS",
    "flush.size": "5",
    "timezone": "UTC",
    "tasks.max": "1",
    "value.converter.value.subject.name.strategy": "io.confluent.kafka.serializers.subject.RecordNameStrategy",
    "locale": "US",
    "format.class": "io.confluent.connect.s3.format.json.JsonFormat",
    "partitioner.class": "io.confluent.connect.storage.partitioner.DefaultPartitioner",
    "internal.value.converter": "org.apache.kafka.connect.json.JsonConverter",
    "storage.class": "io.confluent.connect.s3.storage.S3Storage",
    "rotate.schedule.interval.ms": "6000"
}'
Some notable configs:
s3.region: region of your S3 bucket
s3.bucket.name: bucket name to write data to
topics: topics to read data from
format.class: data format. You can choose from JSON, Avro and Parquet
The pipeline
And voila, your pipeline is now complete. With a couple of docker-compose configurations files and connectors configurations, you have created a streaming pipeline that enables near real-time data analytics capability. Pretty powerful stuff!
Next steps
Now that the Users data is in Kafka as well as our sinks. The email service can pick up customer data coming in real-time, poll the recommendation API, and send a welcome email to the customer within 2 seconds. Likewise, with the data ingested in the data lake, you can create a real-time dashboard for your CEO.
But you don’t have to stop there, as Kafka and its components are horizontally scalable. You can power most, if not all, of your pipelines using Kafka. Some companies run Kafka clusters with thousands of producers and subscribers. Of course, at such a scale, there is more work to do than our simple proof-of-concept setup. But there are managed Kafka services that you can use right out the box, such as MSK on AWS, or Confluent (multi-platform). You can also add more components to process real-time data such as Spark Streaming, KSQL, Beam, or Flink.
Clean up
If you don’t have any other docker containers running, you can shut down the ones for this project with the following command:
docker stop $(docker ps -aq)
Optionally, you can clean up docker images downloaded locally by running:
docker system prune
Conclusion
In this project, we made our marketing team and our CEO happy by building a streaming data pipeline using Docker, Kafka, and Kafka Connect. With what we built, other teams can easily take it from there to deliver what our stakeholders are asking for.
I encourage you to try this project on your own if you never use Kafka before. Happy learning :)