Data lake on GCP using Terraform
in Blog
Back in the old days, dealing with physical infrastructure is a huge burden, which not only requires teams of experts to manage but also is time-consuming. In the modern cloud computing era, however, you can deploy hundreds of computers instantly to solve your problems with the click of a button. Well, to be realistic, most day to day problems that we are trying to solve won’t require that much computing power.
What is infrastructure-as-code (IaC)
Infrastructure as code (IaC) is the process of managing and provisioning computer data centers through machine-readable definition files, rather than physical hardware configuration or interactive configuration tools. Wikipedia
So instead of placing a physical server on a rack, setting up all the cables, configuring the network, installing all the required operating system, you can write codes to do all that. To use IaC, you typically would use a source code control repository, write code to configure your infrastructures, run the code locally, or set up an automation to execute your code on every commit.
Why IaC?
Why bother setting up and learning new stuff to manage your infrastructure while you can do that through the interface of all cloud providers, you ask? There are many advantages to having version control of our infrastructure.
Reproducibility
IaC enables you to create different environments with ease, especially when your project is complex, and there are a lot of moving parts. For example, after setting up a development environment with multiple projects, VPCs, storage, compute instances, and IAM, it is counter-productive to do the same thing for staging and production environment.
With IaC, you can replicate your environment with some minor changes to your codebase. You can even customize your environment to suit your needs. For instance, you can set up different machine types for prod and dev, or set up a more permissive IAM for dev.
Imagine if an intern mess up your production environment, you can tear down everything and build up your environments with ease (given that your underlying data are unscathed)
Security
On a large project, you can have environments with complex permissions and policies. Not only do you have to worry about designing and setting up these environments, enforcing the policies and permissions can also be challenging.
With IaC, every change in your environment is versioned, so you know who makes what changes (given that you limit admin permissions to only your IaC service). You can also periodically scan your environments for differences between the configurations and the actual environments. Most IaC service would then be able to revert your environment to the configurations if they detect any alternations.
Collaboration
When your infrastructures are managed by code, you can share them between teams or use them for later projects. You can also generate infrastructure documentation automatically based on the configurations.
Getting started with IaC using Terraform on GCP
Great, so let’s get started setting up the infrastructure for a data lake on Google Cloud Platform using Terraform. You can use any other IaC tool on any other cloud provider, and I choose this combination since it is familiar to me.
Terraform is an open-source infrastructure as code software tool created by HashiCorp. It enables users to define and provision data center infrastructure using a declarative configuration language known as HashiCorp Configuration Language, or optionally JSON. Terraform manages external resources with “providers”. Wikipedia
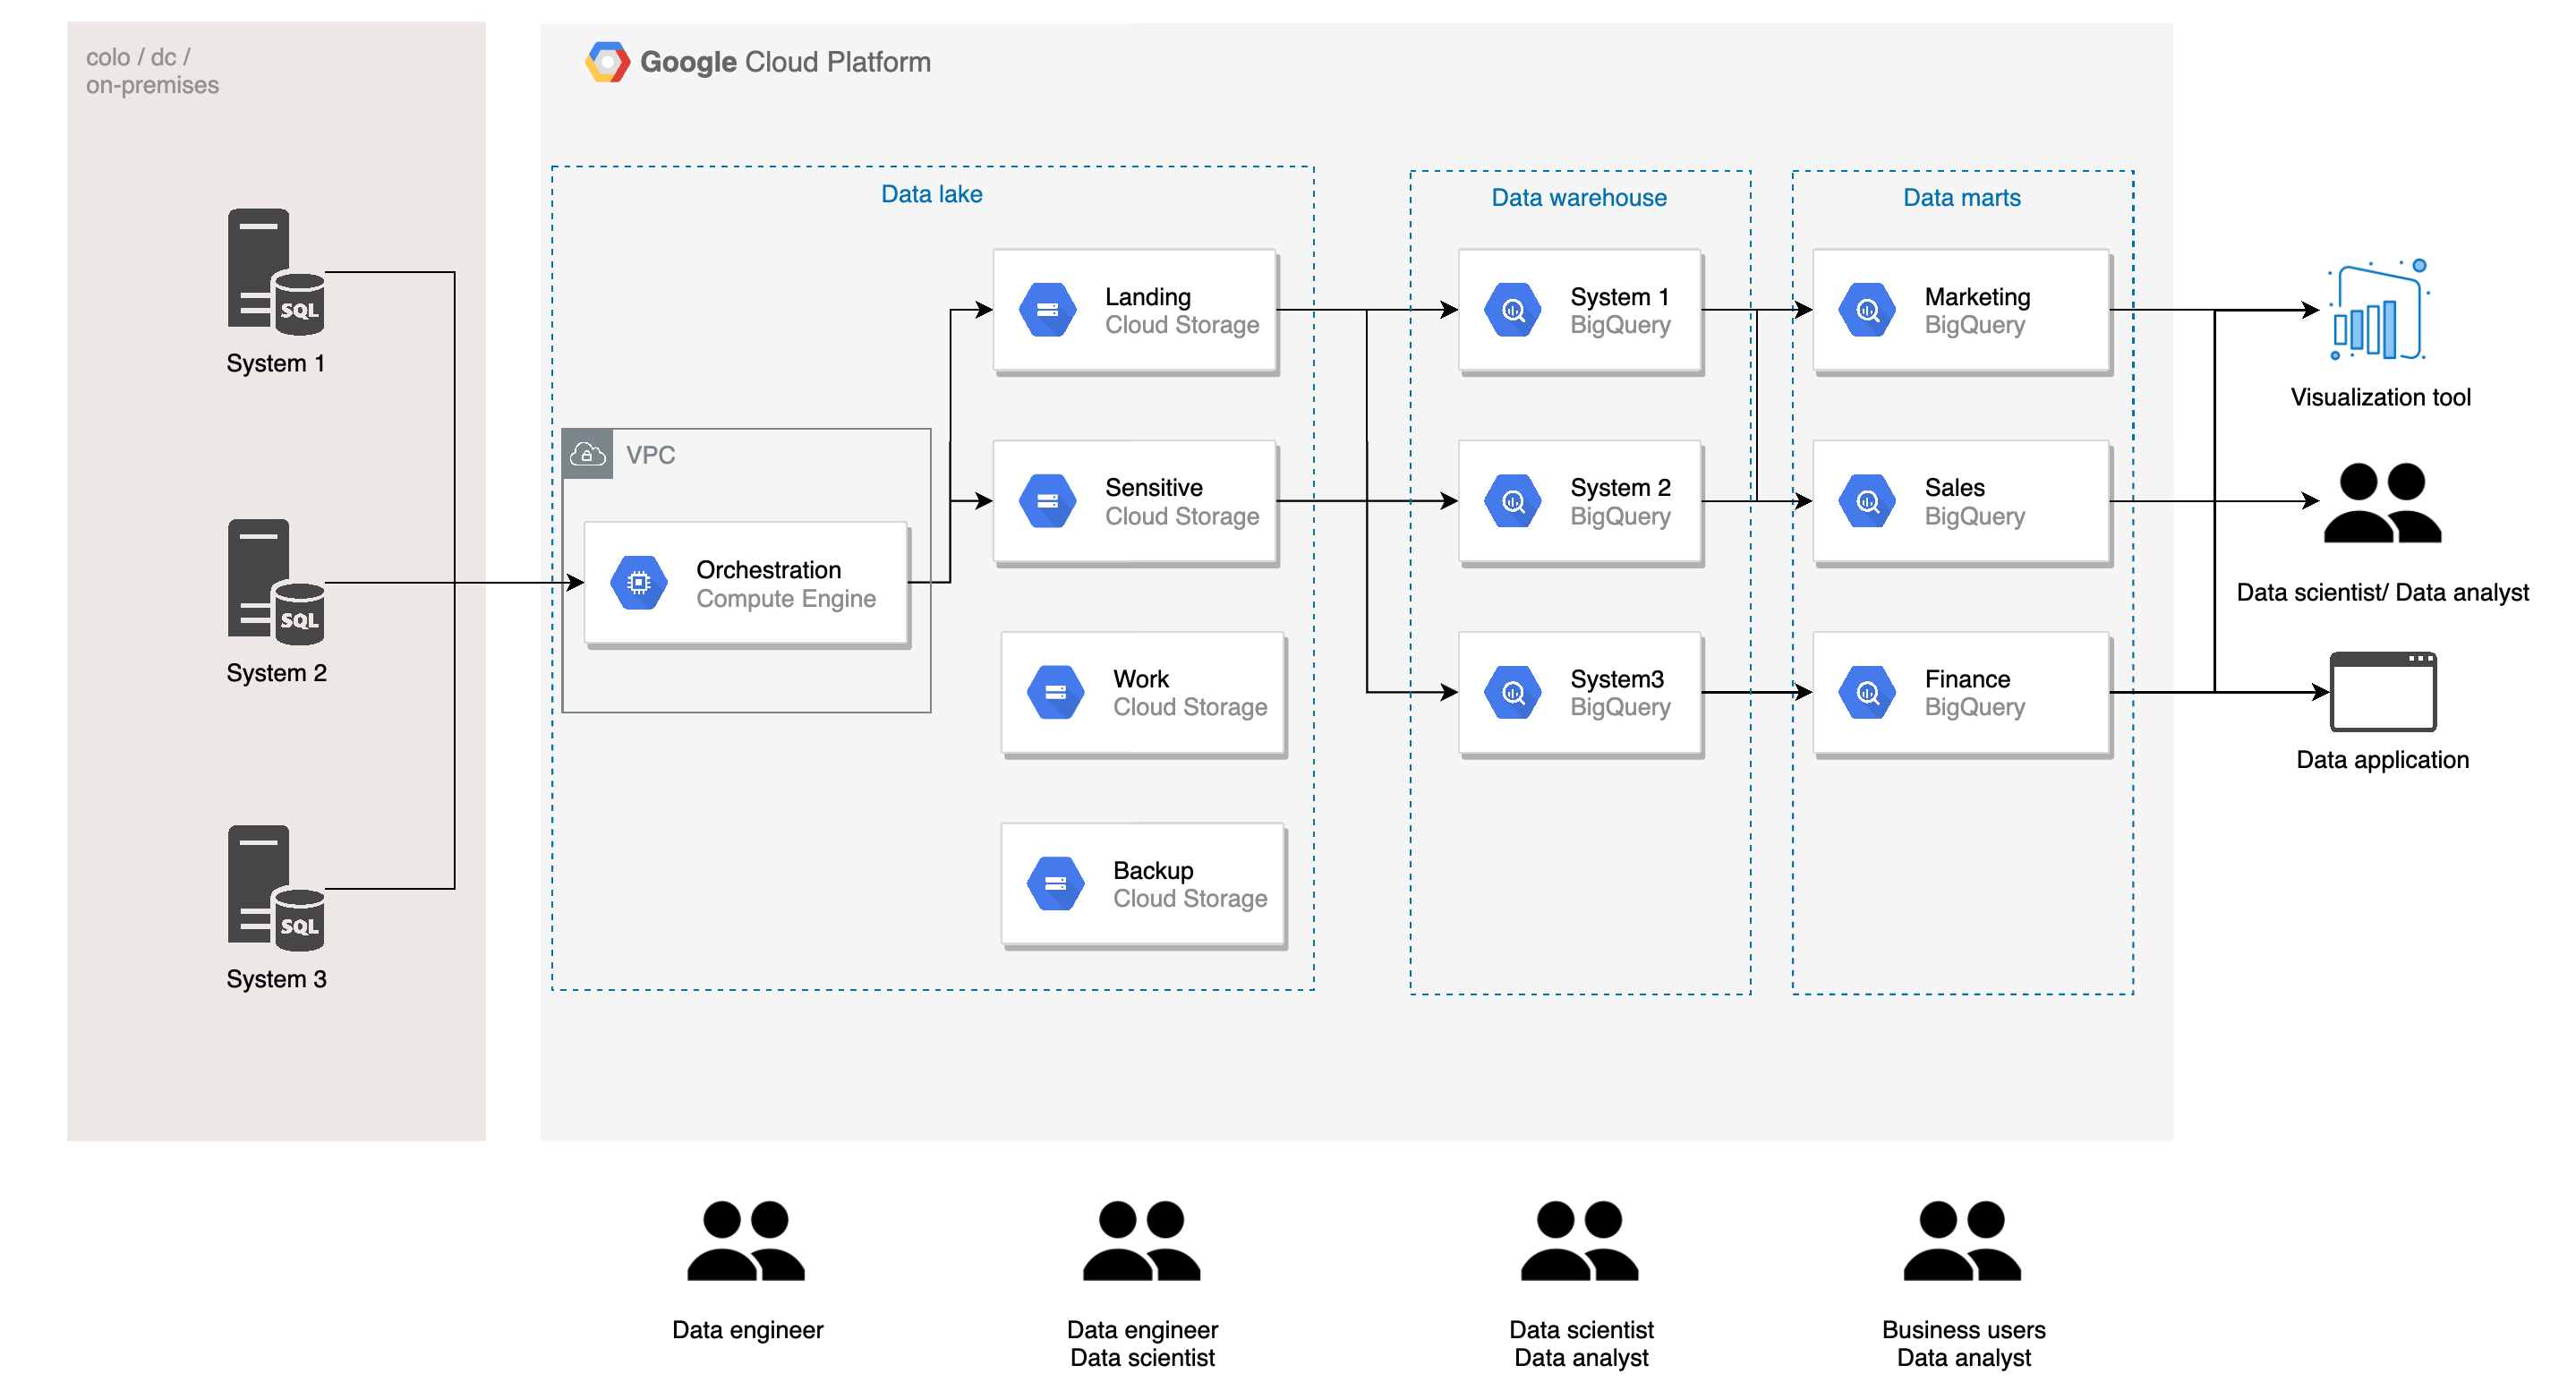
A summarize of what we will be building in this project (image by author)
In this project, we will use terraform code to provision resources and permissions for a data lake on GCP. The diagram above is a simplified version of a data lake, and we will write code to provision and set up everything on GCP.
Let me briefly walk through the architecture of a typical data lake on GCP (for simplicity, I only consider batch pipeline). You would generally have systems producing data, running on-premise, or other cloud providers/project that you need to connect to. You would connect to these systems via VPN or interconnect for security purposes. Then you will need an orchestration/staging server to extract data and load them to your storage buckets.
The data will then be classified and load into different buckets. Raw data would typically be ingested in the landing bucket. Data with sensitive customer information would be treated separately (masking, deidentification, separate permission policy) and load to the sensitive bucket. The work bucket is used for work in process data of data engineers and data scientists, and the backup bucket is for backup of cleansed data.
The data then would be loaded to the data warehouse, where it would be separated based on the system of ingestion (different companies may do this differently). Data here is cleansed normalize/denormalize based on the needs, and model for later use. Data from the data warehouse will be further modeled and aggregated and load to data marts. Data marts are often organized by business functions, such as marketing, sales, and finance.
You can see that we have several layers and different teams accessing these layers. The architecture above is based on our work and specific business problems. Any constructive feedback is welcomed :)
Before we start
You will need to do the following for this project:
Download and setup Terraform CLI: Use this getting started guide to install terraform CLI on your local machine.
Create a Google Cloud account: Sign up for a Google Cloud account, if you haven’t already. You will get $300 credit when signing up, more than enough to get you through this tutorial without spending a dollar.
Get your billing ID: Follow the guide here to find out your billing ID on GCP. You will need it for later use.
Install gcloud CLI: Use this link to help you install gcloud CLI locally.
You can view the full code for this project here. tuanchris/data-lake-iac Use Terraform to set up infrastructure-as-code for a Data Lake on Google Cloud Platform. You will need to do the…github.com
Getting started with IaC using Terraform on GCP
Authenticate with GCP
First thing first, we need to authenticate with GCP. Paste the following comment to a terminal and follow the instructions.
gcloud auth application-default login
Setup main.tf
Create a main.tf file with the following content:
provider "google" {

}
This will set the provider for our terraform project.
terraform init
Create projects
Now we can start setting up our infrastructure. We will start by creating two projects for the data lake and the data warehouse. You can have all of your settings in a giant main.tf file, but I recommend separating based on services. Let’s create a new project.tf file where we will define our project.
The first line will define the resource that we want to create: google_project. The next bit data-lake is the name of the resource to refer to by other services. Replace project_id with a globally unique ID (include your name or your project), and billing_account with your own.
terraform apply
You will see output like so:
# google_project.data-lake will be created
  + resource "google_project" "data-lake" {
      + auto_create_network = true
      + billing_account     = ""
      + folder_id           = (known after apply)
      + id                  = (known after apply)
      + name                = "Data Lake"
      + number              = (known after apply)
      + org_id              = (known after apply)
      + project_id          = "cloud-iac-data-lake"
      + skip_delete         = true
    }

# google_project.data-warehouse will be created
  + resource "google_project" "data-warehouse" {
      + auto_create_network = true
      + billing_account     = ""
      + folder_id           = (known after apply)
      + id                  = (known after apply)
      + name                = "Data Warehouse"
      + number              = (known after apply)
      + org_id              = (known after apply)
      + project_id          = "cloud-iac-data-warehouse"
      + skip_delete         = true
    }

# google_project.data-marts will be created
  + resource "google_project" "data-marts" {
      + auto_create_network = true
      + billing_account     = ""
      + folder_id           = (known after apply)
      + id                  = (known after apply)
      + name                = "Data Marts"
      + number              = (known after apply)
      + org_id              = (known after apply)
      + project_id          = "cloud-iac-data-marts"
      + skip_delete         = true
    }
This is the prompt detailing what terraform will create. Study these to make sure that the results match what you are trying to do, and type yes to the terminal.
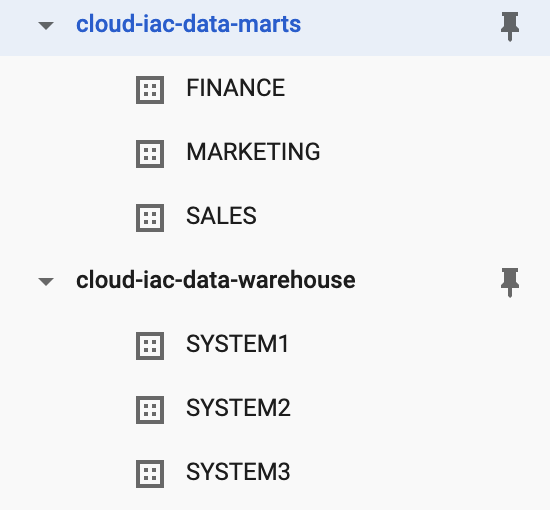
You have successfully created three projects: Data Lake, Data Warehouse, and Data Marts! Go to the GCP console to verify your results. Note that you may have a limit of three projects per billing account that may prevent you from proceeding further.
Define variables
Before moving on, let’s talk about variables. You can see that in the terraform code in our project.tf above, we use specific names for our project ID. That is not always the best way to go. Imagine if we want to use the code somewhere else, we would have to change all the names manually.
Instead, we can define a variables.tf file that will be used throughout the project. We can have commonly used variables stored there. There are different types of variables that we can use, but I will use local variables for simplicity. You can read more about Terraform variables here.
locals {
  region = "asia-southeast1"
  unique_id = "cloud-iac"
  billing_id = ""
}
Create GCS resources
In a similar fashion to create the three projects, we can create 4 GCS buckets that we would require: landing, sensitive, work, and backup bucket. Create a gcs.tf file and paste in the following:
Run terraform apply and input yes , and you will have created four buckets in our data lake project. In the code above, you see that we are using variables to refer to the project and the regions of the buckets. If we need to create the data lake again (perhaps for a different client, or different company), we only need to change the values in variables.tf. Pretty powerful stuff!
Configure ACL permission for GCS bucket
Now we need different permissions for different teams. For example, DE should have access to all buckets, while DS cannot access thesensitive bucket, can only read on landing and backup, but can write on work. We can set that up easily with the following codes:
We would create Google groups to manage people in different teams, making it easier for permission control (instead of having ten different emails here for permission, we only need one email per team).
Keep in mind that if the email does not exist, terraform command will fail.
Data warehouse
Next, we will create datasets for our data warehouse. Referring back to the diagram, we have three systems, and thus, will create three corresponding datasets. Unlike GCS, we can define Bigquery ACL in google_bigquery_dataset definition.
We will configure the same ACL for data warehouse datasets. DE will be the owner of those datasets (in a production environment, it recommended to set up a service account to be the owner), DS will be the writer, and DA will be the reader.
Data Marts
For our data marts, we will have similar configurations to the data warehouse, but with different access permissions.
Compute engine
For the orchestration part, we will build a VPC network, an orchestration instance, and a static external IP address. If you read through the code below, there is nothing complicated going on here. You can read the Terraform documentation on how to create an instance here.
IAM permission
Last but not least, we need to set up the IAM permissions for our project. I will only provide an example for this part, but we can map each group to any roles like below.
Conclusion
In this mini-project, we have created most of the infrastructures necessary to run a data lake on Google Cloud. You might need to dive deeper to customize the code for your particular needs.
Clean up
Don’t forget to clean up the unused resources to avoid any accidental charges. With terraform, you can run a single command to tear everything down.
terraform destroy
Hope you learned something :)